RELATED LINKS
Installation of Hardwood Moulding
Store dry, at place of installation if possible. Keep off floors. Dehumidify job area by running HVAC prior to and during install. Allow 3-5 days for mouldings to acclimate to the install surroundings. Blocking will be necessary behind crowns and wide casings.
Glue mitered corners and nail mouldings to studs when possible. Adhesives can be used to adhere against walls. Biscuit type joints can be used at miters. We recommend controlled environments wherever millwork is extensive.
Installation of Crown and Dentil Mouldings
Crown moulding installations demand precise craftsmanship and represent a variety of challenges. The following guide outlines general considerations.
Address all elements and potential problems from the beginning. Figure the perimeter of each room and determine how many linear feet of moulding you will need. When ordering millwork, always add about two extra inches of moulding for each corner to compensate for any woodworking errors made during finishing or installation.
Visualize Installation and Restrictions – document the precise locations of plumbing rough-ins, electrical and communications outlets, air grills and other obstructions that will affect the installation. Identify stud locations, wall and door frames, and ceiling heights so that holes can be pre-drilled before moulding installation
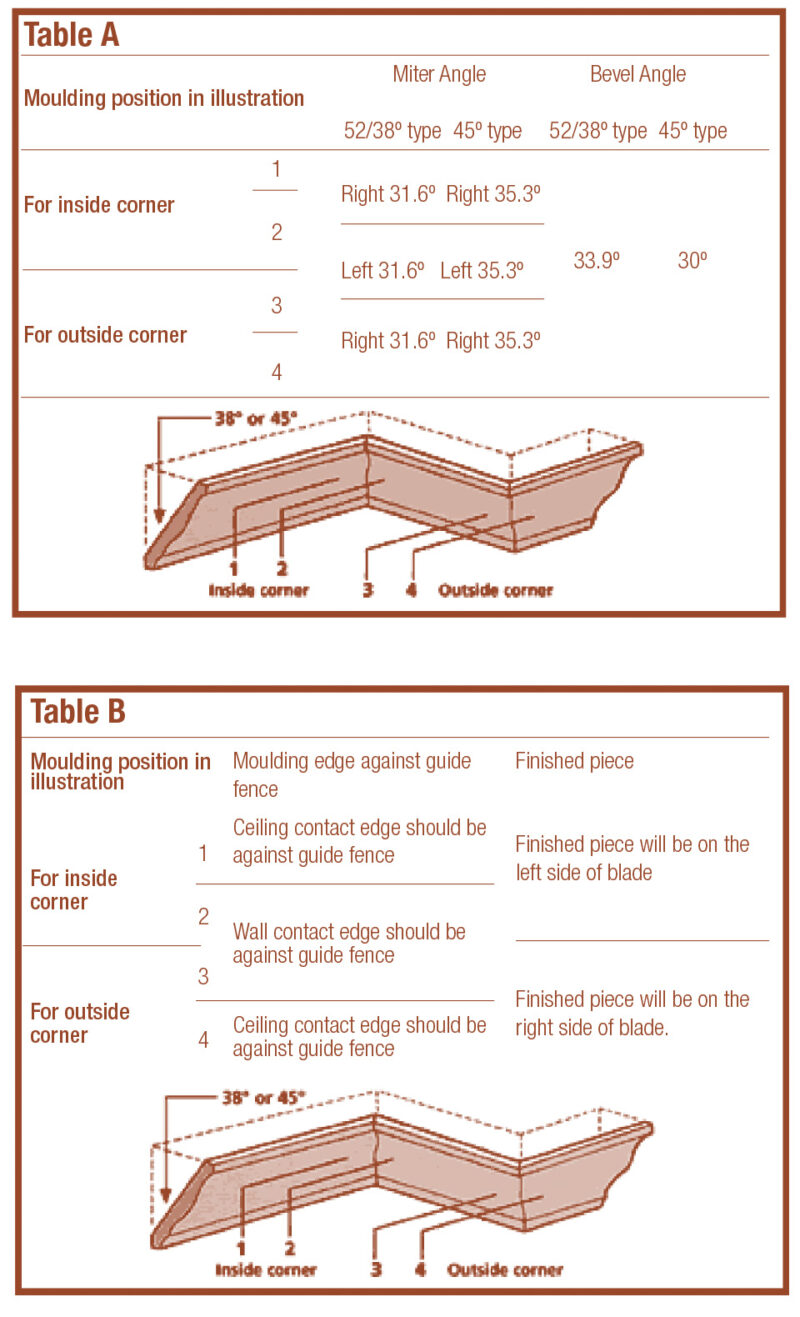
Saw Angles and Related Moulding Positions
When Cutting mouldings on a compound sliding miter saw, set the angles as directed in Table A and position the mouldings on the top surface of the saw base as indicated in Table B.
Figuring Corners and Measuring Wall Angles
Determine the number of inside and outside corners to identify the cuts you’ll need to make (see Tables A and B). Also, walls are not always squared and true. Each corner will require you to measure the wall angles and figure the proper cutting angle. To do this, Place a piece of moulding against the wall at each corner. Work with a small piece of moulding to easily see the angle and measure using a protractor. All angles will have a corresponding setting on your miter saw and the most common angles are detailed in Tables A and B.
Cutting Angle Tips
As shown in Tables A and B, there are two primary miter and bevel angle styles if the wall is a true 90-degree angle. Your installation angle is dependent on the size and shape of the moulding.
It is easiest to cut all mouldings on a sliding compound miter saw, placing the crown moulding with the broad back surface down on the turn base and setting the saw to the proper angle. If you use a standard miter saw, turn the moulding upside down and set it at an angle between the fence and the table.
Completing Installation
Once properly cut and finished, the millwork is ready for installation. Pre-drill nail holes in all mouldings to avoid injuring the finish. Before nailing, apply construction adhesive to the mouldings where they will meet the wall and use wood glue in the mitered corners. Immediately wipe clean any glue that has seeped onto the finished moulding, wall or ceiling. Hold the moulding in place to give adhesives time to set. Then complete the installation by nailing the mouldings securely to the studs with a nail gun.
Installing Dentil Mouldings
If a moulding has dentil and embossing, match the dentil first and let the embossing match as well as possible.
Moulding Saw Angles